Objective
The purpose of this article is to provide guidance to Outreach Admins in setting up and configuring Smart Data Enrichment. The Smart Data Enrichment feature enables Outreach to connect with approved third-party providers and enhance account and prospect records with high-quality firmographic and demographic data. This helps teams personalize engagement, prioritize outreach, and automate prospect discovery based on up-to-date business intelligence.
Applies To
- Data Enrichment
- Outreach Admins with access to configure enrichment providers, settings, and usage controls
- Outreach Revenue Agent
Pre-requisites
- This feature is included as part of Revenue Agent.
- Admin permissions: Ensure you have access to add/modify enrichment settings.
- Data provider access: You must have an active contract or API access for the data providers from which you wish to enrich the data.
- Note that only Outreach-approved providers built via the extensibility framework are surfaced in the admin UI.
Overview
With Smart Data Enrichment, Admins can connect providers, define enrichment logic, and manage how data is updated, ensuring your team works with accurate and actionable records.
For a full list of available data, see Data Enrichment and Data Coverage in Outreach.
Connecting a Provider
- Log in to Outreach as an Admin.
- Navigate to Administration > Integrations > Data Enrichment > Connect Provider.
- Select your preferred provider from the list.
- Authenticate using:
- API Key: Paste and store your API key securely.
- OAuth: Complete the OAuth authorization flow.
- Outreach will confirm connection status upon successful authentication.
Only providers that are compliant with Outreach's OPDP protocol and approved through the Developer Portal will appear in this list.
Setting up and Assigning Multiple Providers to Data Categories
Admins can browse all connected enrichment providers in the Data providers tab under Administration > Integrations > Data enrichment. Each provider is surfaced dynamically via the extensibility framework, ensuring that only Outreach-approved, compliant providers are listed.
To add an additional provider, set up as you would when connecting a provider. Once connected, Outreach will validate the credentials and confirm successful connection status.
Admins with access to multiple data providers can assign individual data categories to the providers of their choice. In addition, they can define the cascading order of enrichment by ranking them in order.
- Log in to Outreach as an Admin.
- Go to Administration > Integrations > Data Enrichment > Enrichment Settings.
- Select Account or Prospect.
- Use the 3-dot menu next to a category and select Choose provider.
- Select the providers to use for that category.
- Order the providers using the drag-and-drop interface.
- Confirm the choice by clicking Save.

Note: The cascading order switches to the next provider in order if there are no matches or if there are errors in communicating with the attempted provider.
Configuring Enrichment Settings
Assign Providers to Data Categories
Admins can assign specific providers to individual data categories (e.g., firmographics, leadership).
- Log in to Outreach as an Admin.
- Go to Administration > Integrations > Data Enrichment > Enrichment Settings.
- Select Account or Prospect.
- Use the 3-dot menu next to a category or the Configure button to assign a provider.

Defining permissions on data enrichment as an Admin
By default, data enrichment is disabled for customers. Admins can manage who has access to enrichment actions via Profiles > Data enrichment:
- Allow Account enrichment
- Allow Prospect enrichment
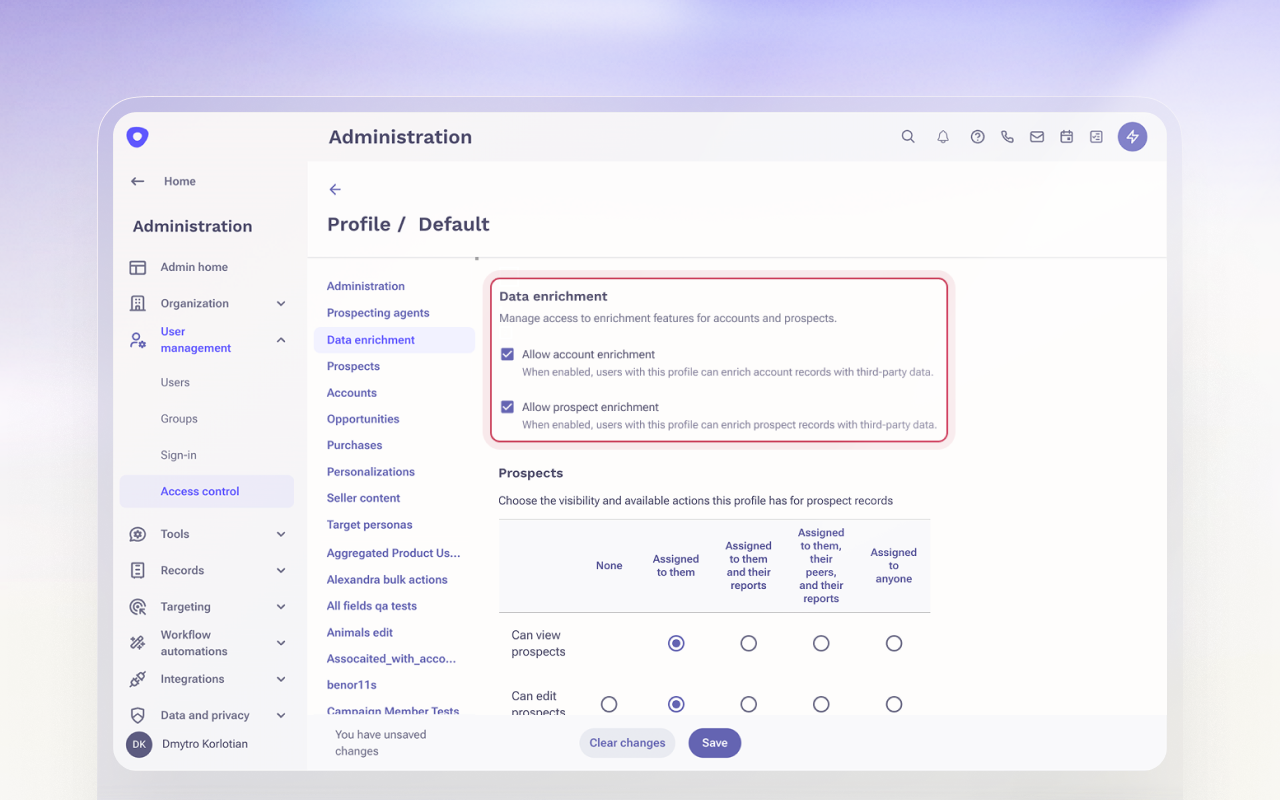
This controls whether users can mark records for enrichment or stop enrichment on existing records.
Assign Providers for Net-New Records (Identify)
Used for sourcing brand-new prospects via filters like industry or geography.
- Log in to Outreach as an Admin.
- Go to Administration > Integrations > Data Enrichment > Enrichment Settings > Prospect.
- Click on the three dots beside New record sourcing, then select Choose provider.
- Select your preferred provider and click Add data provider.
New records can be sourced via Revenue agents. To learn more about Revenue agents, please visit here.
Field Update Rules
Outreach supports granular control over how enriched values update existing fields. Define how enriched data updates existing fields:
- Always overwrite: Replace existing values with enriched data.
- Conditional overwrite: Populate only when the field is currently blank.
- Do not update: Field is not updated.

To configure field update types:
- Log in to Outreach as an Admin.
- Go to Administration > Integrations > Data enrichment > Enrichment settings.
- Select either Accounts or Prospects.
- On the relevant data category row, click the 3 dots context menu icon > Configure fields.
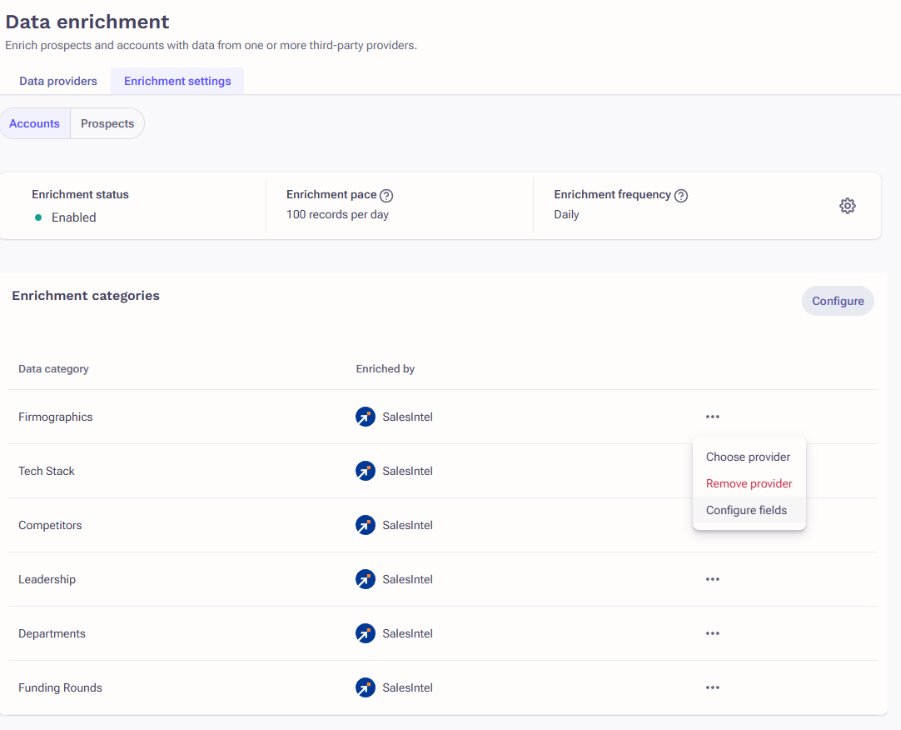
- In the resulting window, configure as needed.
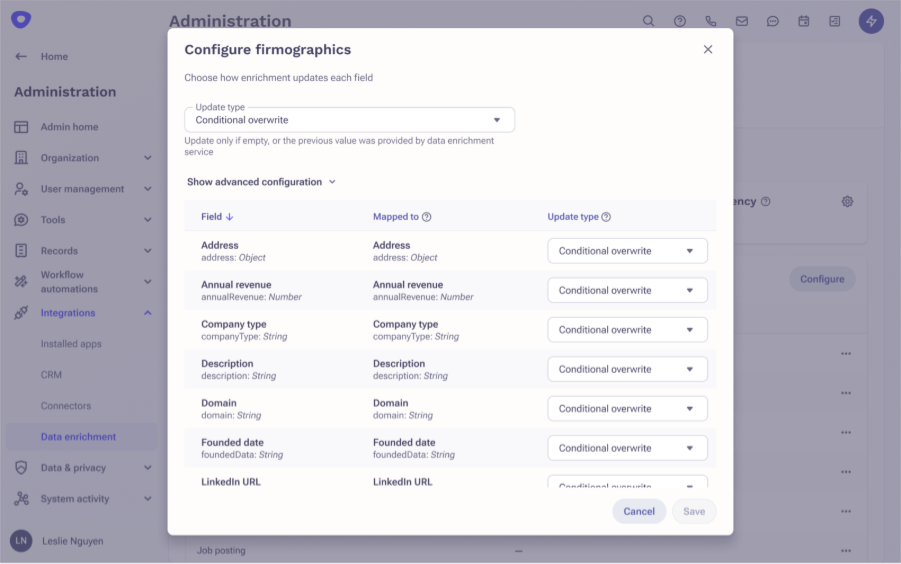
- Click Save when complete.
Enablement and Usage Controls
Control when and how enrichment is applied:
- Global enablement: Toggle enrichment on or off per object type (Accounts, Prospects).
- Enrichment pace: Set the maximum records enriched per day.
- Enrichment frequency: Choose refresh intervals (daily, weekly, monthly, never).
- Log in to Outreach as an Admin.
- Go to Administration > Integrations > Data Enrichment.
- Select Prospect or Account.
- Click the gear icon next to Enrichment configuration.
- Configure settings in the modal dialogue.

How to Configure and Use Signals in Smart Data Enrichment
Outreach supports signals covering expansion events, leadership changes, intent spikes, competitive activity, and more. These signals give sales teams a richer picture of account activity — enabling smarter targeting, prioritization, and personalization through Revenue Agents and AI-powered outreach.
For a full list of signals supported, see also Smart Data Enrichment FAQ.
Note:
- This feature requires an active ZoomInfo Copilot product. No additional Outreach license is needed, but ZoomInfo Copilot access is required to retrieve these signals.
- Signals are refreshed weekly by ZoomInfo and remain valid for 7–90 days depending on the signal type.
Set up
Admins must enable Data Enrichment and assign ZoomInfo as the signals provider before sellers can use this feature.
- Log in to Outreach as an Admin.
- Navigate to Administration → Integrations → Data Enrichment.
- Click Connect Provider and connect your ZoomInfo credentials (API key or OAuth).
- Once connected, go to Administration → Data Enrichment → Enrichment Settings.
- Select the Signals tab.
- Assign ZoomInfo to the signals you wish to enable.
- Click Save.
Note: Signal pace and frequency are not independently configurable at this time. They follow the Account-level pace and frequency settings.
How to Configure Website Signals
Website visit signals allow customers to identify companies and individuals at companies that are showing intent for their products or services by visiting the customers' web pages. Using these signals, sales teams can target, prioritize, and personalize outreach through sales plays.
Note: Website visit signals indicate increased web visit activity for an account or prospect.
Website visit signals are classified into the following types:
- Website visit signal high (Account): Indicates high activity of website visits for the Account.
- Website visit signal medium (Account): Indicates medium activity of website visits for the Account.
- Website visit signal high (Prospect): Indicates high activity of website visits from an identified Prospect in an Account.
- Website visit signal medium (Prospect): Indicates medium activity of website visits from an identified Prospect in an Account.
To setup Data Enrichment must be enabled for the Website activity category:
- Log in to Outreach as an Admin.
- Click Administration > Integrations > Data enrichment.
- Click Connect Provider.
Once enabled, the website activity signals are configured to be retrieved from ZoomInfo based on the overall pace and frequency of enrichment.
How to Configure Intent Topics
Intent Topics help identify companies that are actively researching specific subjects online, revealing early buying intent before any direct engagement occurs. This enables sales teams to prioritize outreach, automate plays, and tailor messaging based on data-backed buyer interest.
Before You Begin
- Provider requirement: Intent Topics are currently supported through ZoomInfo. Support for additional providers will be added in the future.
- Provider setup: Topics must already be configured and active in the provider's platform before they can appear in Outreach.
Procedure
1. Connect a Data Enrichment Provider That Supports Intent Topics
- Log in to Outreach as an Admin.
- Navigate to Administration → Integrations → Data Enrichment.
- Select a provider that supports Intent Topics (currently ZoomInfo).
- Authenticate using the provider's method (API key or OAuth).
Once connected, Outreach automatically retrieves and displays available Intent Topics from the provider account.

2. Enable Intent Topics Enrichment
Once your provider is connected and topics are synced:
- Go to Administration → Integrations → Data Enrichment → Enrichment Settings.
- Under Account, click the ⋯ (three dots) menu next to the Intent Topics category.
- Select your provider from the dropdown list.
This enables Outreach to enrich Account records with Intent Topic data from your selected provider.

3. Refresh Intent Topics
Organizations can update the topics they track in their enrichment provider at any time. The list of tracked Intent Topics in Outreach is automatically refreshed before each enrichment to ensure it reflects the latest configuration.

4. Use Intent Topics in Revenue Agents
Revenue Operations users can use Intent Topics to create automated workflows that trigger plays or actions for accounts showing high intent.
To configure:
- Open Revenue Agents.
- Create (+Revenue agent) or edit an agent.
- Within the Target accounts window, click Add filter and select Intent Topic (multi-select field).
- Define additional filters such as intent level or intent date to refine targeting.

Example: If an account shows high intent for "AI Sales Tools" within the past 30 days, search for relevant prospects within the account and them to a corresponding sequence.
Intent data can also be combined with other filters such as firmographics and signals to build precise, intent-driven automations.
Important: Accounts must be marked for enrichment in Outreach to receive Intent Topic data from the provider. If an account isn't enriched, no intent information will be available for agents to act on.
To mark accounts for enrichment, go to Accounts, filter out accounts you want to mark for enrichment and use 'Mark for Enrichment' bulk action.
Understanding Intent Scores
All providers evaluate a company's recent research activity compared to its historical baseline. To maintain reliability and reduce noise, Outreach uses a unified interpretation:
| Intent Tier | Normalized Score Range | Description |
|---|---|---|
| Medium Intent | 60–75 | Indicates increased research activity above normal levels. Suitable for fully automated workflows (e.g., auto-enrollment in automated sequences). |
| High Intent | 76–100 | Represents strong, statistically significant surges in interest. Ideal for higher-touch plays. |
Scores below 60 are excluded from the Outreach UI and API to filter out low-signal or normal baseline activity.
5. Use Intent Topics in Account and Prospect Views
Once configured by an admin, Intent Topics become visible throughout Outreach:
Filtering & Targeting
- Reps can filter Accounts by Intent Topics directly in list views.
- This allows for dynamic, topic-driven lists and bulk actions, such as enrolling prospects in sequences, sending bulk emails, or creating tasks, without leaving the list view.

Browsing Account's Intent Topics
- On the Account detail page, sellers can see all Intent Topics currently associated with the account.
- This helps prioritize outreach and personalize conversations based on what the company is actively researching.

Frequently Asked Questions
How long are signals valid?
Signals may be valid for 7 to 90 days, depending on the signal type, based on information from ZoomInfo.
How frequently are signals refreshed?
ZoomInfo evaluates signals for freshness every 7 days.
Is an additional license required?
No additional Outreach license is required. However, customers must have an active ZoomInfo Copilot subscription to access these signals.
Are other data providers supported for signals?
Additional providers are under evaluation.
Where can I view full signal details?
Signal details — including the full signal text — are available under Account → Activity → Signals. Future updates will enable deeper analysis and insight generation from signal data.
Was this article helpful?
That’s Great!
Thank you for your feedback
Sorry! We couldn't be helpful
Thank you for your feedback
Feedback sent
We appreciate your effort and will try to fix the article